How to Build a Freeze Dryer
 Dr. Tontul
- 13 Sep 2023

Understanding the Freeze Drying Process
Freeze drying, also known as lyophilization, is a process that removes water from a substance while preserving its structure and nutritive value. This method is widely used in the food preservation and pharmaceutical sectors. However, it requires high investment for domestic use. This is why some people want to build their own home freeze dryers. Understanding the freeze drying process is crucial for anyone considering building their own DIY freeze dryer.
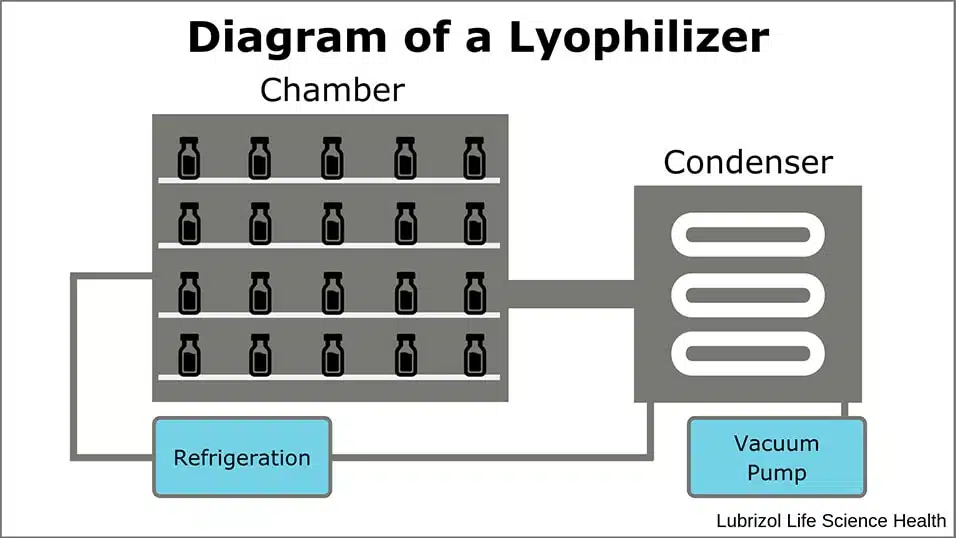
The first step in freeze drying is to freeze the material to be dried. This can be accomplished simply by placing the material in a freezer. Once frozen, the material is transferred to a vacuum chamber where sublimation takes place. Here, sublimation takes place under the influence of vacuum and preferably heat. At this stage, condensers are used to prevent the moisture evaporating from the material from damaging the vacuum pump.
To obtain the best results from freeze dryers, careful monitoring of temperature and pressure is required throughout the entire process. However, it is possible to manufacture freeze dryers at home with serious effort using the appropriate materials.
Assessing the Feasibility of a DIY Freeze Dryer
When assessing the feasibility of building a homemade freeze dryer, you should consider several factors. First, assess whether you have the technical skills and knowledge to successfully design and build such a complex device. Understanding the principle of installation and operation of vacuum systems, heating elements and cooling mechanisms is essential to ensure the proper functioning of the homemade freeze dryer.
Next, you should consider the availability and cost of the necessary materials and equipment. To build a do-it-yourself freeze dryer you will need to source components such as an airtight chamber, vacuum pump, heating system and refrigeration unit. New ones can be quite expensive. However, they can be found on second-hand markets at more affordable prices. Also cables, hand tools,
You should also carefully consider whether investing the time and effort to build a homemade freeze dryer is compatible with your specific needs and goals. Generally, the capacities of these home-built freeze drying systems are quite low. Therefore, it may not be appropriate to build DIY freeze drying systems for high capacity needs.
Gathering the Necessary Materials and Equipment
To successfully build a DIY freeze dryer, various materials and equipment are required.
1. Vacuum chamber
First, you will need a vacuum chamber or container that can withstand low pressures. This chamber can be made of durable materials such as stainless steel and thick glass or plastic to prevent any leakage during the freeze-drying process. It should be hermetically sealed to maintain proper vacuum conditions.
2. Vacuum pump
Next, you will need a reliable vacuum pump. A high-quality pump that can deliver low pressures is essential to create and maintain the required vacuum level inside the chamber.
Look for pumps designed specifically for freeze drying applications. These are equipped to perform moisture removal efficiently.
When choosing a vacuum pump, consider factors such as pumping speed, ultimate pressure and noise level. For efficient operation and minimal maintenance, it is recommended to choose a rotary vane pump or a oil-free diaphragm pump.
3. Heating equipment (Optional)
If you are not in a hurry and your vacuum chamber is light-permeable (and the dryer must be placed in daylight) you may not need heating equipment. The UV energy in the daylight will supley the energy to the material. However, the drying time will be significantly longer.
If heating elements are used, you can use electric heaters or hotplates. The heating equipment should be small enough to fit in the vacuum chamber. It should also transfer heat to the material at low rate. Excessive use of heat during drying can cause the material to melt and deteriorate.
4. Condenser (Optional)
During drying with vacuum and energy effect, solid water turns into vapor phase. The vapor is drawn towards the pump by the vacuum pump. Therefore, water vapor passes through the pump. In the meantime, it can mix with the pump oil in oil pumps and damage the moving parts in oil-free pumps. This significantly reduces the life of the vacuum pump, which is an expensive piece of equipment.
To prevent this situation, ice condensers or ice traps are placed between the vacuum chamber and the vacuum pump. This cooling equipment is kept at temperatures as low as -40ºC (-40ºF). When the vapor comes into contact with this equipment, it turns back into solid form and cannot reach the pump. This prolongs the life of the pump.
5. Other items
In addition to these main components, several other items are required for successful freeze drying. You will need trays or shelves to place food or materials on during the process. These can be made of stainless steel in heated systems and non-reactive materials such as food-grade plastic in other systems.
You will also need vacuum-resistant hoses to connect the drying chamber, the pump and the condenser. If a condenser is used, insulation materials can be used for energy efficiency.
Finally, control and automation of the system requires electronics, temperature monitoring devices such as thermocouples or infrared sensors, and a vacuum gauge.
Gathering these basic materials and equipment before starting your DIY freeze drying project will give you a significant advantage in building an efficient system.
Designing and Constructing the Freeze Dryer Chamber
There are several key factors to consider when building a freeze drying chamber. First and foremost, the chamber must be airtight. Therefore, the chamber should be made of materials such as stainless steel, glass and plastic. Furthermore, sealing elements such as rubber gaskets or silicone should be used to ensure an effective seal.
Size and capacity should also be considered when designing the freeze dryer chamber. The dimensions of the chamber depend on the amount of products you plan to dry. The dimensions of the shelves and trays where the material will be placed and the dimensions of the heating equipment should also be taken into account.
As a general rule, approximately 10-15 L volume is needed for each 0.1m² tray area.
Stainless steel shelves or food-grade plastic trays are used to place your products during freeze drying. The number of these shelves or trays should be determined according to the capacity. There should also be gaps between the shelves or trays to allow water vapor to escape.
Installing the Vacuum Pump and Heating System
The vacuum pump and the heating system are important equipment to achieve optimum freeze drying results.
Install the vacuum pump in an accessible location near the freeze dryer chamber. Make sure that all connections are secure to avoid any leakage that could disrupt the seal during operation.
Also, install a suitable heating system inside the chamber to facilitate effective sublimation of ice crystals in frozen food.
Proper airflow management is vital when installing the vacuum pump and heating system. To ensure efficient performance, connect suitable hoses between the freeze dryer chamber and the vacuum pump. This will ensure that air is removed from the chamber while maintaining vacuum throughout the process.
Remember to regularly inspect and maintain both the vacuum pump and the heating system for optimum functionality. Clean or replace filters as needed to avoid blockages or contamination issues. Regularly monitor temperature levels in the freeze dryer chamber using reliable thermometers or sensors.
Implementing a Reliable Cooling System
The cooling system is the condenser that cools the vapor generated during sublimation and converts it back into solid form. The refrigeration system not only improves the drying performance but also extends the life of the vacuum pump.
When designing your homemade freeze dryer, consider using a high-quality condenser that can cool the vapors efficiently. Choose a condenser with sufficient surface area to maximize heat transfer and ensure optimal performance. Also, choose a stainless steel condenser to withstand low temperatures and prevent fouling.
In addition to selecting the appropriate equipment for your refrigeration system, condensation chamber should be properly insulated to minimize heat loss. Insulation helps to maintain constant temperatures inside the chamber while preventing environmental conditions from adversely affecting the process.
Controlling Temperature and Pressure for Effective Freeze Drying
To achieve effective freeze drying, it is very important to control the temperature and pressure inside the freeze dryer. The temperature must be carefully monitored and adjusted throughout the process to achieve the best results. Maintaining a consistent temperature is essential to preserve the integrity of the dried product.
An important factor in controlling temperature is to use a reliable heating system. This system must be able to provide precise and even heat distribution to each product.
Controlling pressure is equally important in freeze drying. The vacuum pump plays a vital role in creating and maintaining low pressure conditions inside the chamber. Proper adjustment of pressure levels is essential for the sublimation process to continue.
Now you can enjoy your tasty freeze-dried strawberries
Testing and Troubleshooting Your Homemade Freeze Dryer
Some tests and troubleshooting are useful to ensure the effectiveness of your homemade freeze dryer. First of all, check the temperature and pressure gauges regularly throughout the freeze drying process. This will help you identify any fluctuations or inconsistencies that could affect the quality of your freeze-dried products. Also, monitor the drying time of each batch to ensure consistent results.
Determine the moisture level of your dried products to ensure that drying is adequate. For this, you can use pre- and post-drying weights or a moisture balance. The ideal moisture content depends on the type of product. However, it should generally be below 5%. If you notice that your products are not reaching this target, change the temperature or drying time.
If you encounter problems such as uneven drying, there are several steps you can take to remedy them. Check that the heating system provides an even temperature at all points and that there are no problems with the vacuum loss airflow. If you cannot solve the problems, consider seeking professional help from an expert in refrigeration systems or vacuum technology.
Safety Considerations and Best Practices for DIY Freeze Dryers
An important element of safety when operating a homemade freeze dryer is to ensure that all electrical connections are safe and in good condition. Faulty wiring can lead to electric shocks or fires. It is therefore vital to regularly check and maintain your equipment. Also, always follow the manufacturer's guidelines for using electrical components and never overload circuits.
In addition to safety precautions, there are also best practices that can improve the efficiency and effectiveness of your DIY freeze dryer. For example, properly cleaning and disinfecting all surfaces before starting each freeze drying cycle will help maintain the quality of your final product. It is also advisable to carefully monitor temperature and pressure levels throughout the process using reliable measuring instruments such as thermometers and gauges.